Masking
FSLView can be used to create image masks and
manually edit images.
To create a mask, first load in the
image that you want to base the masking on. Make sure that the
loaded image is highlighted in the Image
List. Then press File -> Create Mask. This will create a
new blank image that will appear in the
Image List. This overlay has the same dimensions as the
original image; you will still see the original image because the mask
image is currently empty and so is transparent.
To edit an existing image just unlock it (see below)
and select the masking/editing mode in the Mode
Toolbar.
To draw on an image it must be highlighted in the Image List
and it must be unlocked. If it is
locked then a small padlock symbol  will appear next to the image name on the Image
List. Click on the Padlock checkbox at the bottom of the
Image List to lock or unlock the image for editing. Select
Masking mode by clicking on the pencil icon on the
Mode Toolbar. Moving the mouse over the image while holding
down the left mouse button allows you to draw on the image.
will appear next to the image name on the Image
List. Click on the Padlock checkbox at the bottom of the
Image List to lock or unlock the image for editing. Select
Masking mode by clicking on the pencil icon on the
Mode Toolbar. Moving the mouse over the image while holding
down the left mouse button allows you to draw on the image.
You can change the slice viewed by pressing the Page Up or
Page Down keys when the mouse cursor is over an image. You can
also move the cursor incrementally using the Arrow keys.
To save the edited image / mask, make sure the image is highighted
in the Image List and then press File -> Save As.
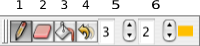
- Pen Button (1) - selects Pen
mode for drawing voxels into the image with the
current Pen Value.
- Erase Button (2) -
selects Erase mode for removing
("zeroing") pixels.
- Fill Button (3) - fill closed shapes with Pen
Value.
- Undo Button (4) - undo up to 5 of the most recent
drawing actions.
- Pen Value (5) - changes the value that is written
into the image when drawing.
- Pen Size (6) - controls the pen width (voxels X
voxels) when drawing.
|
|